Tuesday, April 05, 2011

TWO FUN PROJECTS IN RED

Cori and I have been working fools the last couple of days, especially since the big Farm Chicks Show in Spokane is less than 2 months away.  We know it is going to sneak up on us, and we want to be as prepared as possible for this huge undertaking.  We have our "to do" lists tacked up in the garage, and believe it or not, I dare say there is more floor space in the garage than there was a couple of weeks ago, as we are trying to complete as many projects as we can.
First up is this coffee table we got for a steal for only $5.00.  It is so solid, and when we saw it, knew that all we would have to do is redo the table top.  But then, as always, we got to thinking.  Looking at the wrought iron framing around the bottom of the table, we knew it needed a shelf, but how could we make it functional, but yet fun too?
We decided to do a dry brushing of a great red that Cori had used in the past, which let the wood grain show through after I had sanded it down to bare wood.  Then remember those yardsticks I mentioned in my last blog entry?  We cut a piece of plywood and covered it with all the old yardsticks we have purchased over the past few months.  After attaching the shelf with brackets to the framing, we sat back and admired a great looking coffee table.
But we didn't stop there.  A few weeks ago, we snagged three old oars at an estate sale.  I sanded them down to bare wood and then Cori and I dry brushed a coat of white paint on them.

Taking a bit of inspiration from one of the numerous catalogs that Cori receives daily, we taped off areas on the oars to paint red.  Once dry, they were distressed and then a bit of espresso bean glaze was used to give them an aged look.  I would love to have the room at my own home to hang a couple of these on the wall!

Saturday, April 02, 2011

CRAIG'S NEW RIDE

I couldn't completely stop blogging about trucking, after all, with having lived my life out on the road for five years, it kinda gets into your blood.  So how is this for irony.....like I said, I was out for five years, and always hoped for a new truck that hadn't been trashed by a previous driver that smoked, because no matter how much Frebreeze you use, that smoke stink never goes away.
So along comes Roy, not even a year under his belt, and he gets to enjoy a brand new, fresh smelling truck.  Now as Craig likes to tell me, if I had chosen to drive along with him, we probably would have had that new truck together, but no amount of bribery, new truck or money wise, can ever convince me to drive a commercial truck, heck, just driving our pickup is big enough for me.

But I am so very excited for Craig and Roy that they have taken possession of a new 2011 Kenworth T660 with all the bells and whistles, and a new APU to boot.  It was like Christmas morning yesterday morning when they got to move into their new digs.

They were given a load out of Toppenish, WA to pick up this morning, and after arriving there, they were beeped with a message to drop the trailer and bob tail to Aurora, OR to take over another team's load into Phoenix.  Seems that team, who had also taken possession of a new truck the same time as Craig and Roy, already had engine problems with it.  Hold on, it gets better.

As Craig and Roy make there way towards Aurora, they also start having some issues with the truck, and are routed to the nearest Kenworth dealership in Yakima, WA to have it checked out.  I just received a text message saying that they were back on the road again, without finding anything wrong, but with the usual "keep an eye on it" instructions from the mechanic.

All in all, Craig likes that there is so much more room, that the seats can fully recline, and after five years of hearing me complain of not having a cup holder in the three trucks we had, a Freightliner, an International, and a Peterbilt, he was happy to report that the Kenworth does indeed have two cup holders!

Thursday, March 31, 2011

A QUICK AND EASY PROJECT

                                  
I'm always looking around the garage at all the odds and ends we have lying around and knew that we wanted to do an "EAT" sign, especially with us completing the kitchen island piece.  So when I found this wood plaque in our pile of wood scraps, I knew it would make the perfect foundation for a quick and easy project.
Cori had recommended using one of the vintage cookbooks and menu planners we had scored at a yard sale last weekend.  This publication was printed in 1949 and a lot of the menus they were suggesting certainly dated them.  I went about cutting out bits and pieces of the pamphlet and when I was satisfied that I had enough, I broke out the Mod Podge.
When I had sufficiently cover the wood place, I let it dry, while I spray painted the "E", "A", and "T" letters that we have also been lying around for month collecting dust in the garage.  After the plague was dry, I applied a black glazing which gave it more of an aged look, and then went around hot gluing on the letters which by this time had also dried.
I covered the back with burlap, and called it a finished project.  We'll display this on a small display easel on the kitchen island, along with some new platters with glass domes that we completed when we go to the retail space tomorrow.  We had a pretty busy day today, finishing up a few projects and finally starting on that piece I teased you about last week with the yard sticks.  We plan to have that ready to take to the store by Tuesday.
In other news, Craig and Roy received a phone call earlier this week with some pretty great news.  Seems they will be one of the first teams to take ownership of a brand new truck when they arrive in the company yard in Spokane.  They will be there tonight, but won't take possession until morning.  I can't wait to get some photographs from him, and to be able to see it in person next weekend when Craig comes back into Spokane for home time.

I am linking to  The Shabby Nest Frugal Friday

Thursday, March 24, 2011

THE BIG REVEAL

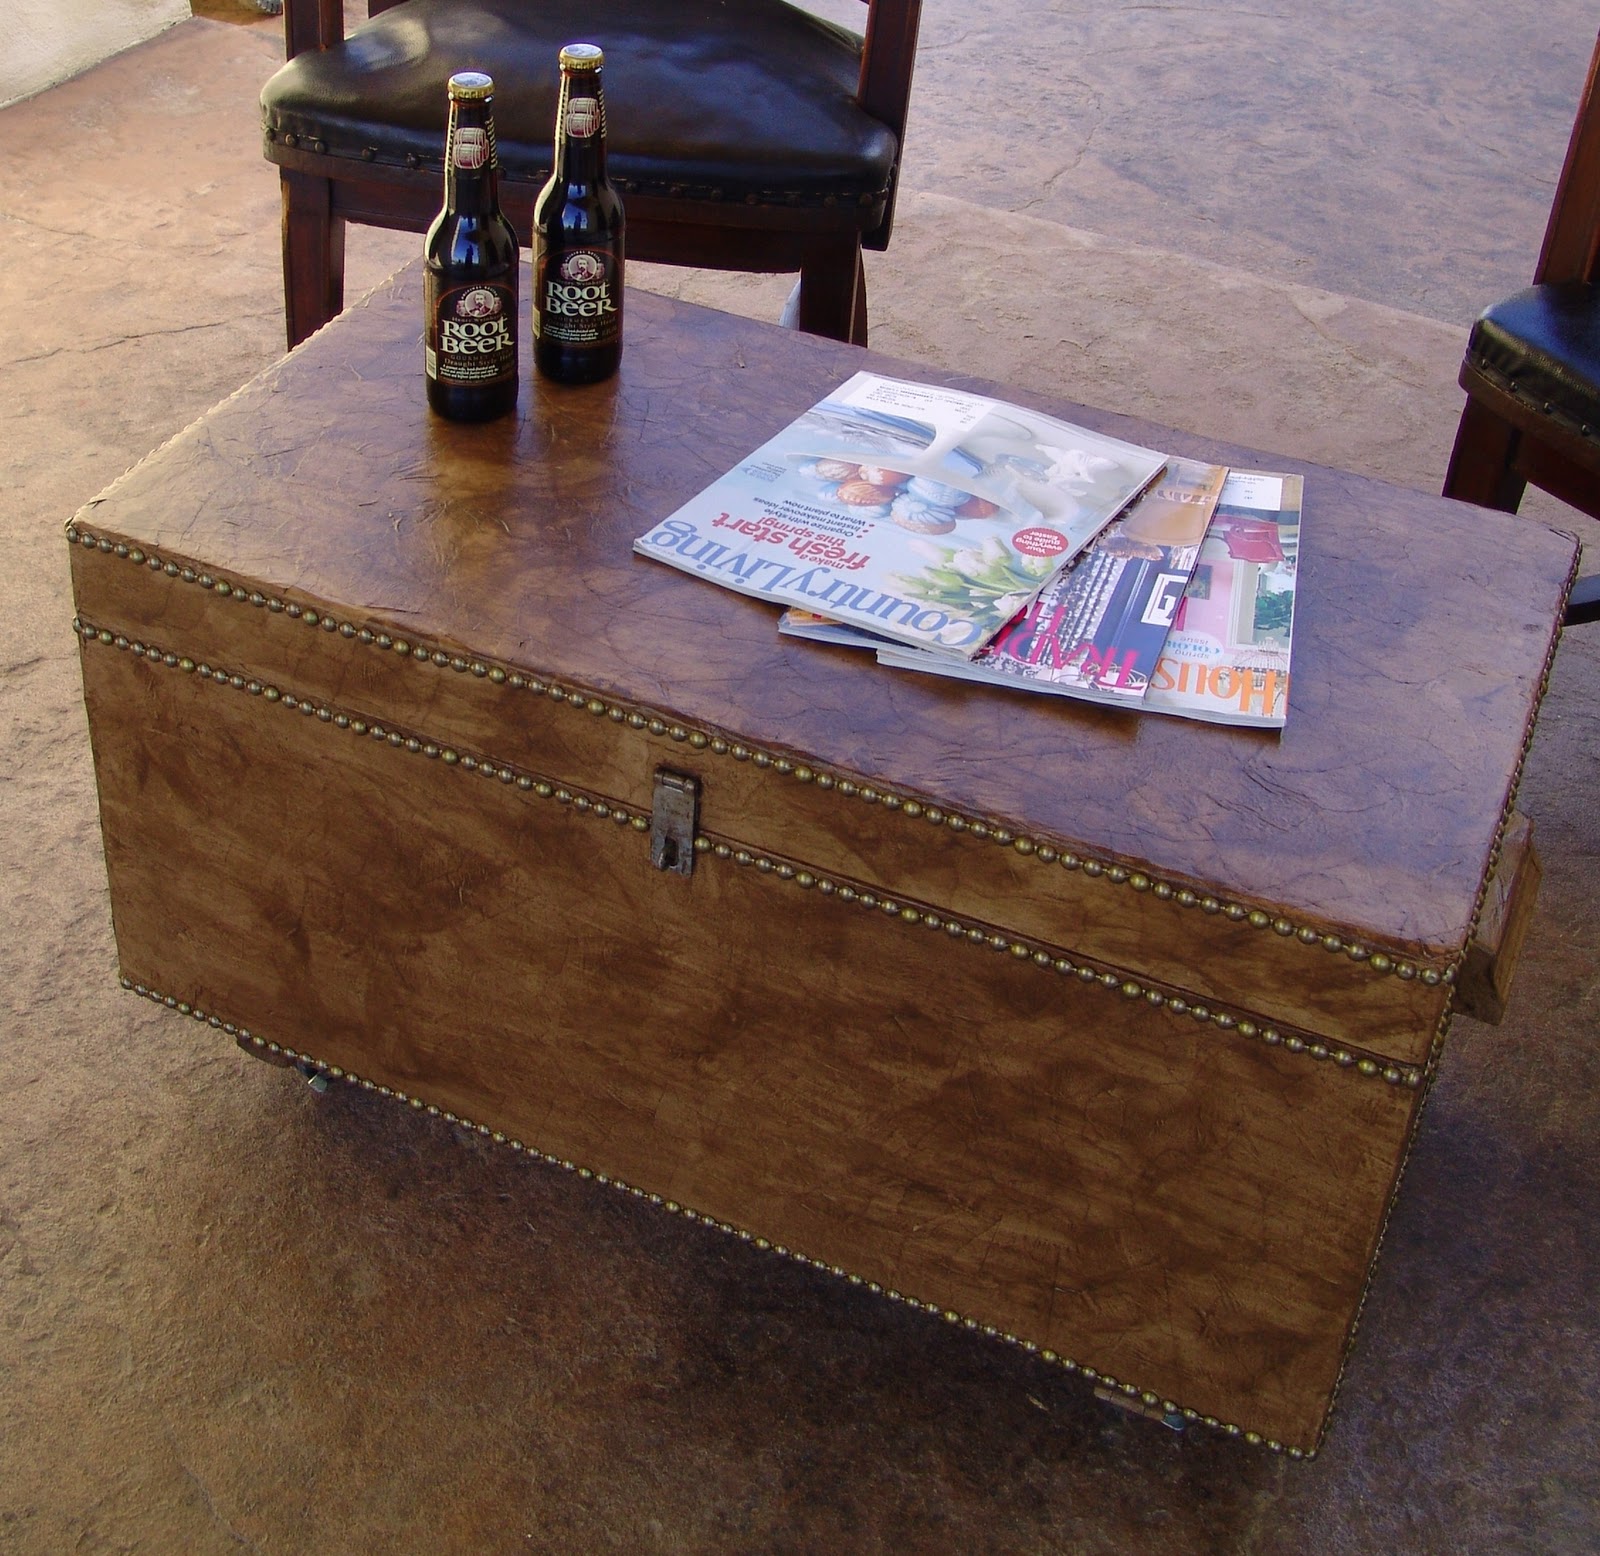
Here is a reminder of what this piece looked like when we picked it up at the Church sale for $5 dollars, but after Craig had installed the caster wheels to the underside.  Cori and I wanted to try the technique we used on a dress form, to try and transform this well used tool chest into a coffee table.   After tearing up pieces of brown painter's paper, the Mod Podge was opened up and the applying of the paper and glue commenced.
After allowing for dry time, a glaze of espresso bean brown was applied, lighter and darker in areas in an attempt to make it look like leather.  Then we went about pounding in the nail head trim, and when we stepped back and surveyed our handiwork we had this:
We're pretty happy with the outcome, but we are even happier with how this next piece turned out.  If you can imagine it, it started out as a home made stereo cabinet from back in the day.  It was basically just a plain wood box, and like an old house, no true straight edges or corners to be had. Cori envisioned the record holding area as a great plate rack, so we took out every other divider to make room for a plate.  That in itself was a lesson in patience. 
When I mentioned in the earlier post that Craig will think twice about volunteering to help us, all he has to do is think about the frustration in putting this piece back together again after Cori and I had taken it apart.  He kept mumbling out loud about numbering the pieces as we took them out to know where they went when they go back in, but sometimes Cori and I can't be bothered with such details when inspiration hits.
We went to our local Home Depot, which we seem to go to at least a couple of times a week, and picked up some bead board and molding to give it a more sophisticated look.  Again Craig was doing a lot of mumbling about those crooked corners and funky way it was put together, but he persevered, and the end result was what we like to call an island storage cabinet.
Because, really, we can see it being used in a kitchen, it does have room to house a microwave, or a dining room as a great additional buffet for added serving room, or even in a living room as a wonderful display piece.  I bet someone could even make it into a fabulous bar with all that storage, and with the backside finished off so nicely it could be the center attraction at any get together.
So that's what we have been up to this past week, and now it's onto our next projects we have sitting in the garage awaiting our attention.  I'll tease you with this...........one of the next pieces we start on, will get a great makeover using old yard sticks

Monday, March 21, 2011

WHAT DO YOU GET?

What do you get when you combine some long discarded candlesticks:
Some well used enamel plates:
and the glass dome off of a wood cheese plate?
You get the cutest shabby chic way to present your latest baked goods or fresh fruit.
We are on the lookout for more of the glass domes in every thrift store and yard sale that we can find, along with unique candle sticks and enamel plates.  We can't get enough of these cuties, and with the help of epoxy glue, they are a snap to put together.  We'll make sure to have as many of these that we can when we head to Spokane for the Farm Chicks Show in June.
Here is a sneak peek at our next project in the works.  I don't want to give too much away, but we snagged this vintage wood tool chest at the church sale a few weeks ago.  Craig attached some caster wheels to it when he was here last week.  We see it as a great coffee table with fabulous storage.  Just wait and see how this little diamond in the rough turns out.  I hope to have pictures of the completed project by Friday.  Until then, I better get back to work.  Just when we thought we were making head room in the garage, it seems to be filled to the rafters again, and it's not even the busy yard sale season yet!

Friday, March 18, 2011

TOO BUSY TO BLOG

I don't think I have ever gone this long with out a blog entry.  I feel really bad about that, but we have been very busy, not only repurposing furniture, but with dress form orders.  We just completed an order for three dress forms that will be in a boutique in the Austin, TX area, and just starting on an all pink dress form that will be a surprise for a 14 year old girl living in Studio City, CA.  On top of that, it seems that yard sale weather has hit in Walla Walla, and we were out and about very early this morning hunting down treasures.
You can see from the back of the van that we were successful at almost all of the addresses we checked out.  Half of the items were already taken out of the van by the time I took this picture, but you can still see the two wood and leather chairs, in excellent condition, that we snagged for $32 dollars each.  Those chairs will clean up really nice with some leather conditioner and some elbow grease.  There is a stamp from the manufacture on the back that I am going to research to find out more about them.
We also snagged a great coffee table for $10 and those oars which will make great wall accents.  By the time we were done, we had pretty much spent our budge for the week, which will force us to stay home this Sunday instead of going to the Church sale, and spend some time working in the garage trying to finish up some projects we have in the works.
I can at least show you what became of these two church pews we got last month.  After sitting in the garage awaiting their turn in the spray booth, they turned out quite nicely, and now proudly occupy a space in our retail store.  We have so much stuff, our spaces are almost over crowded and as soon as anything sells, like a door and a large picture that sold this morning right before we arrived, we quickly place new items in their place.  We are so thankful to have our storage area in the back of the store to keep our extra inventory.

We continue to prepare for the big Farm Chicks Show in June, and with the promise of two more dress form orders in the process of fine tuning the final details, and the garage full of furniture, we will not have to figure out what to do with our time.  I think you'll pretty much find us with paint under our fingernails and dust and dirt on our clothes, but we wouldn't want it any other way!

Monday, March 07, 2011

INTRODUCING......SYMONNE

Not one to sit idle when the creative juices are flowing, Cori and I started in on a new concept for a dress form almost immediately after finishing up Maebel (the lemon/fabric) dress form.  We wanted to created a very vintage looking dress form, and looking around the garage, found some brown painter's paper.  I went about tearing it up into mismatched small pieces and then broke out the Mod Podge and started brushing away.  We completely covered the form from head to base in the brown paper but knew she would need a little "something something" to make her special.
Cori has a gazillion ideas tucked away, not only in her creative brain, but in stacks and stacks of magazines.  She remembered seeing a belt that was made out of burlap binding which is normally used in reupholstering.  To the binding, we tea stained a couple of thin muslin towels, and then cut them into 4 inch strips making use of the already finished edge.  Gathering it up in a running stitch, we ruffled the towel and adhered it to the underside of the binding with liquid stitch.  We cut two more strips for the tie, and attached two large wood buttons as an accent on either side of the belt.
We then thought about what type of graphics to put on her, and came up with this lovely graphic which tied in the red from the belt.  Add "Paris" to the chest and a date we took from the business graphic and we were ready to glaze her.  Traditionally, with the music sheet dress forms, we have used a copper glaze, but as I said before, we truly wanted an old, vintage feel to this dress form, so we went to our stand by glaze in the garage, Ralph Lauren Faux Glaze tinted in Espresso Bean brown.  With the first wipe of the glaze, we knew this would be the perfect finishing touch to this dress form.  It almost makes it look like it was made out of solid wood that has been aged for years and years.
We don't have a home for Symonne yet, but she will be listed on line at Cori's Etsy shop here.  She will also reside in one of our two spaces at the consignment store, that is if I don't decide to kidnap her myself for my living room at home.  I have completely fallen head over heels in love with this one, from the vintage door knob top to the cute belt, down to the vintage graphic which she has front and back!

Thursday, March 03, 2011

A COUPLE OF NEWLY COMPLETED PROJECTS

Remember this dresser?  We got it at the church sale.  A well built dresser out of actual natural wood, not those wood manufactured products of particle board or pressed board.  This dresser would be steak, compared to the ones you buy at the big box stores, which for this analogy we will call spam. 
Always trying to do something a little unexpected, we played off the two recessed panels on the sides of this dresser and decided to cover them in some coordinating fabrics.  Then, just to add a little surprised, we coverd one of the drawers in fabric as well.  Hopefully someone will take a liking to it as much as we do, once we take it to the store tomorrow.
The crowning acheivement this week so far, has been the transformation of this china cabinet, from it's former life, to it's new updated look.  The only before picure I have is with all the doors and hardward missing, but I think you can get the idea of what it looked like.  We purchased this back in December, and it is by far the biggest piece we have worked on.
We knew we wanted to make it lighter, and in a cottage style, so we painted it cream, but added a bit of unexpected and painted the back wall teal.  We think it adds just the right amount of "pop" to the piece, and doesn't the brown accent pieces we added to stage it look grand?  Although you can't really see it from the pictures, but up close, it has a light distressing along all of the detail lines.  The hardware was also changed out and replaced with vintage crystal knobs.
Now we have the job of trying to load this hutch into a vehicle and transporting it to our retail space.  We'll definitely need a little more man power than what Cori and I have together.  Thank goodness Cori's husband will be able to help us tomorrow afternoon.  Now we just have to make sure we make room for it in one of our two spaces and stage it again for the big weekend crowds.

LinkWithin

Blog Widget by LinkWithin